
RFP Request for Proposal
This tutorial solves a common problem for people who regularly write bids. The RFP – request for proposal – contains several requirements.
Introduction
A coverage matrix between your bid and the RFP helps your customer to:
- Check that the RFP he has carefully written has been fully read and covered
- Find exactly where a requirement is taken into account in your bid
- Check where your bid does not fully fit a requirement
- Navigate between his RFP structure and your bid structure
It is therefore good practice to send such matrices. Unfortunately most RFPs have no formalized requirements. The only way to identify a sub-part of the RFP is to use the chapter numbers. In this case, you have to create a table in your bid presenting where and how each RFP chapter has been covered.
For example:
| RFP § | BID § | COMMENT |
|---|---|---|
| §1 Introduction | §1.2 Context | |
| §1.1 Overview | §1.2 Context | |
| … | … | |
| §2.4.2 Graphical User interface | §2.2.3 Rich client application | Windows platforms only are supported |
With an RFP in MS Word with few chapters (less than 20 for example), this can be done manually by :
- copying the table of contents in the first column
- completing it with lower chapter levels that are not listed in the table of contents
- manually completing the BID and COMMENT columns
However, with an RFP in PDF format where text cannot be easily copied, or with a huge RFP with hundreds of chapters, or whenever your boss asks you to update your bid chapter structure just before the end of RFP countdown time, this matrix becomes a dreadful nightmare… 🙁
Have you never dreamed of a simple method for automatically building and updating this matrix?
Reqchecker makes this possible.
Step 1 – Create a Reqchecker project
The first first step consists in creating a project and including the files: RFP and proposal.
Let’s take an RFP with the following chapter structure:
1.0 Company
2.0 Purpose
3.0 Objectives
4.0 Target Audiences
5.0 Criteria for Evaluating the Success of a PR Agency
6.0 Query Handling
7.0 Accuracy
8.0 Rights Reserved
9.0 Award of Contract
10.0 Confidentiality
First of all you must create the project file. To make things easier all documents can be stored in the same folder, for example called ‘matrix’. Right click on the RFP, then click on “Add to coverage” menu to create an empty project.
Double click on the .cover file to update the project settings:
- Select the RFP in the file list.
- Select ‘Heading’ in the ‘Data Source Information’ section.
- Click on the ‘Edit’ button and force the file code to ‘RFP’.
- Click on the ‘Add File’ button.
- Select the bid file in the file browser. In this example the name is ‘My BID.docx’.
- Select the BID file from the file list.
- Select ‘None’ in the ‘Data Source Information’ section to skip the heading of the bid itself.
- Click on the ‘File’ menu, then ‘Save’ to save your modifications.

Step 2 – Insert tags in your proposal
Insert a coverage tag wherever your proposal answers a chapter, or part of a chapter, of the RFP.
For example, the RFP text contains:
12.0 Project Duration
12.1 The project will commence on 1 February 2015, and will be completed by 31 July 2015.
12.2 Dates of commencement and completion of the project shall be stated in the contract.
Let’s imagine that the associated chapter in the proposal is:
1 Overview
2 Technical proposal
3 Administrative proposal
3.1 Schedule
The project duration is 6 months. The project starts 2 weeks after order.
The estimated schedule is:
- 15th January: order
- 1st February: project kick-off
- 31th July: final delivery
<<RFP§12.0>> <<RFP§12.1>> <<RFP§12.2>>
The <<RFP§12.0>> text is the tag indicating that this chapter fully covers the requirements of RFP chapter §12.0.
To keep the proposal legible, tags are usually written in grey in a small font. Good practice recommends using a Word style. In this way you can, if required, hide tags by selecting font size 1 and white.
Tag syntax is defined in the Reqchecker ‘Coverage’ tab and can be modified:
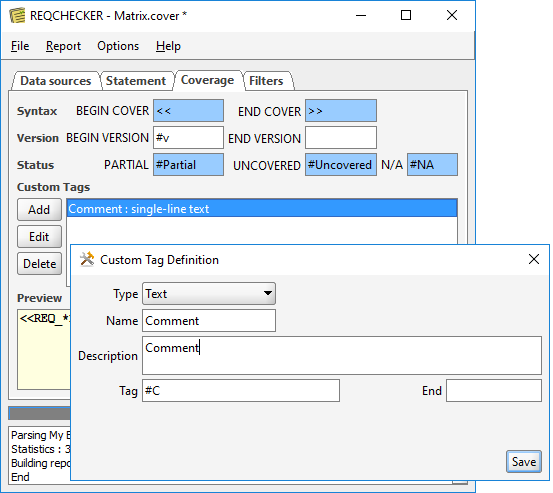
Coverage tags can embed more information. For example:
- <<RFP§12.0>> #Partial means that not all requirements are covered here.
- <<RFP§12.0>> #Uncovered means that requirements are not covered in the proposal. The final coverage rate will be reduced.
- <<RFP§12.0>> #NA means that requirements are not applicable to the scope of the bid. They will be ignored and the the final coverage rate will not be reduced.
- <<RFP§12.0>> #Uncovered 25% means that only 25% of requirements are not covered. This allows a fine tuning that presents the highest rate possible to the customer.
- <<RFP§12.0>> #C this is a comment will register a comment in the coverage matrix. This is a custom coverage tag. It is possible to create several tags to manage coverage.
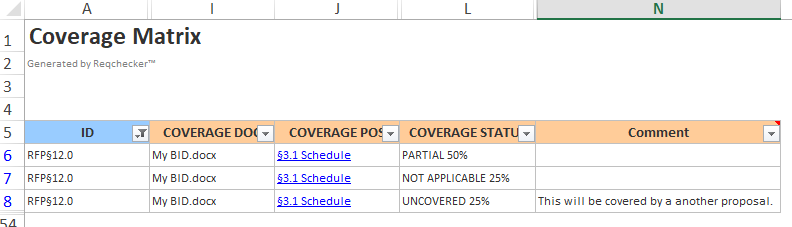
All of these can be combined. For example : <<RFP§12.0>> #Partial 50% <<RFP§12.0>> #NA 25% <<RFP§12.0>> #Uncovered 25% #C This will be covered by a another proposal. means that 50% of this chapter is covered, 25% is uncovered and 25% is inapplicable to the bid.
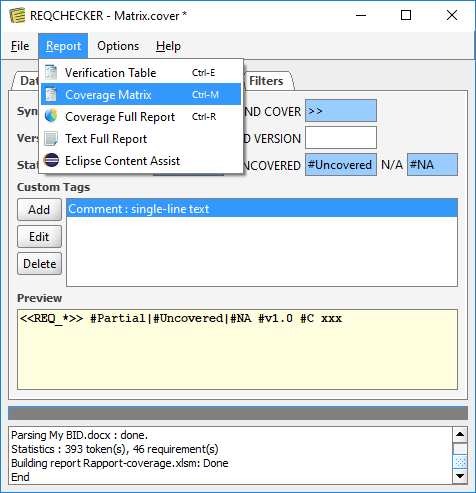
Step 3 – Generate the coverage matrix
Click on the ‘Report / Coverage Matrix’ menu to build the EXCEL matrix.
The first tab presents the coverage rate in a pie chart. Select the second tab ‘Matrix’ tab. Remove or hide unwanted columns and filter on the §12.0. The resulting display will be something like:
You can either copy the matrix into your proposal, or click on the ‘Report / Coverage Full Report’ menu to attach the detailed PDF version.
Step 4 – Update the coverage matrix
Here you can replace the RFP with an updated matrix, or update your proposal. Even if you move chapters of your proposal or text around, or if you make any other kind of modification, just re-compute the report to get an updated matrix within a few seconds.